Server-to-server authentication in Salesforce without losing your mind

Server-to-server authentication in Salesforce without losing your mind
Introduction
You arrive on a Monday at 9:00 a.m. and someone tells you in the daily that an external server needs to communicate with Salesforce: read records, modify them, execute logic... You start going through the documentation and run into terms that are not exactly easy to digest: connected apps, external client apps, OAuth flows, JWT...
Then the cybersecurity team reminds you that you cannot do it just any way. You start sweating, the nerves kick in, and suddenly it feels like you are facing a three-headed dragon.
The first challenge in any server-to-server integration is authentication: getting Salesforce to trust your server and issue an access token that lets it operate. Without that token, there is no integration.
In this article we will go through the two strategies Salesforce offers for this scenario: Client Credentials Flow and JWT Bearer Flow. When to use each one, how to configure them, and what the security differences are between them.
Inbound integrations are communications initiated by an external system toward a Salesforce org. Imagine a website that needs to show customer cases or a web server that deletes customers who no longer belong to the company; both are external servers that read data or perform actions inside Salesforce. A demonstration of this kind of integration can be found here.
Connected Apps used to be the traditional way to create an entry point into a Salesforce environment. However, starting with the Salesforce Spring 26 release, the creation of new Connected Apps has been blocked, and that functionality has moved to a new model called External Client Apps.
External Client Apps
It is easy to understand how an External Client App works if you think of it as the front door of your house. It is the place where you can let guests in under controlled conditions, and that door can be opened in different ways: with a key, with a code, by ringing the bell, or simply by leaving it open.
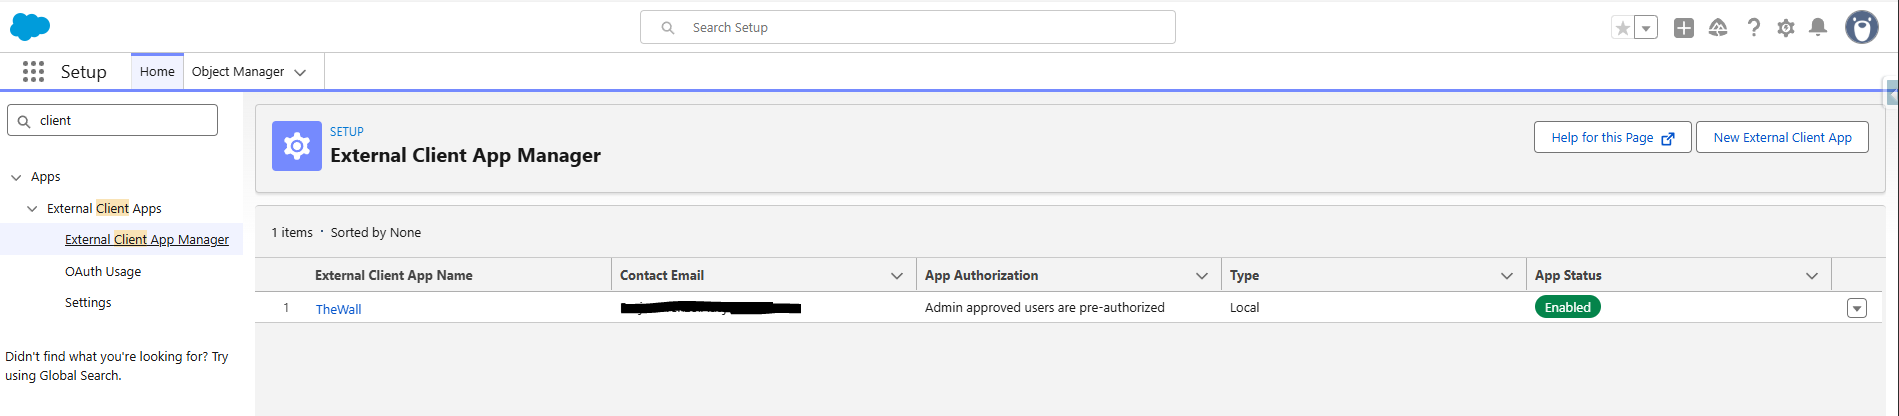
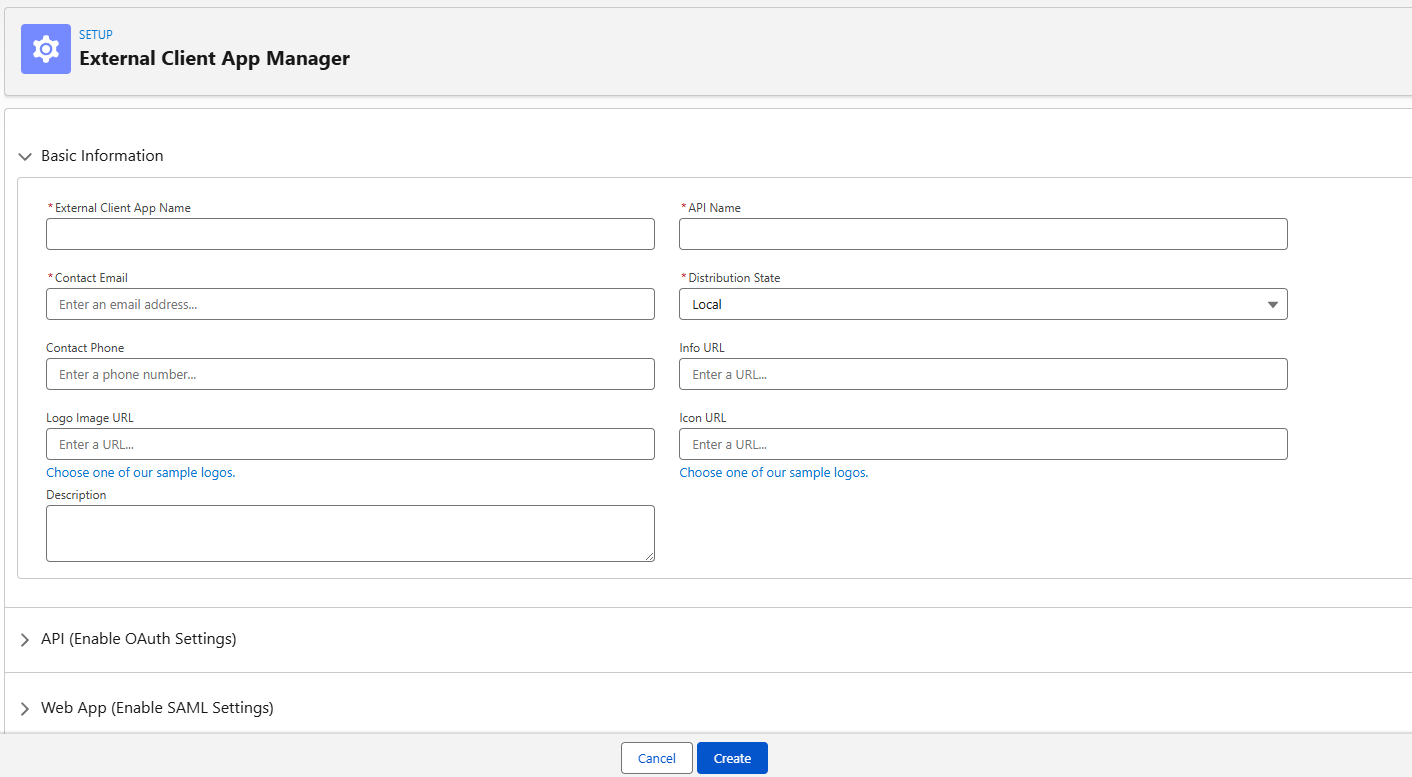
External Client Apps can be managed from the External Client App Manager section in Setup. When you create a new app, Salesforce asks for basic information such as a name, API name, contact email, and contact phone number. It will also ask you to start configuring it, but that part can be completed later with more time.
OAuth protocol
Access to Salesforce APIs always goes through an access token. It is similar to having the keys to your house, with the important difference that this access is limited in both time and scope. In other words, it expires after a certain period and only grants access to the APIs that we explicitly decide to allow.
The most common way to obtain that access token is the OAuth protocol. There are multiple strategies, but the end goal is always the same: getting a valid access token that can be used to communicate with Salesforce.
We can enable OAuth in the External Client App configuration. Salesforce asks for a Callback URL at that stage, but it is only used in very specific scenarios; in most cases, leaving https://localhost is enough.
Once OAuth is enabled, there are two main things to configure:
- OAuth Scopes: This defines which tools and APIs the external service will be allowed to use. In many cases, Manage user data via APIs is enough because it enables standard Salesforce REST APIs, but you should always review the full list of OAuth Scopes to tailor access to the actual use case.
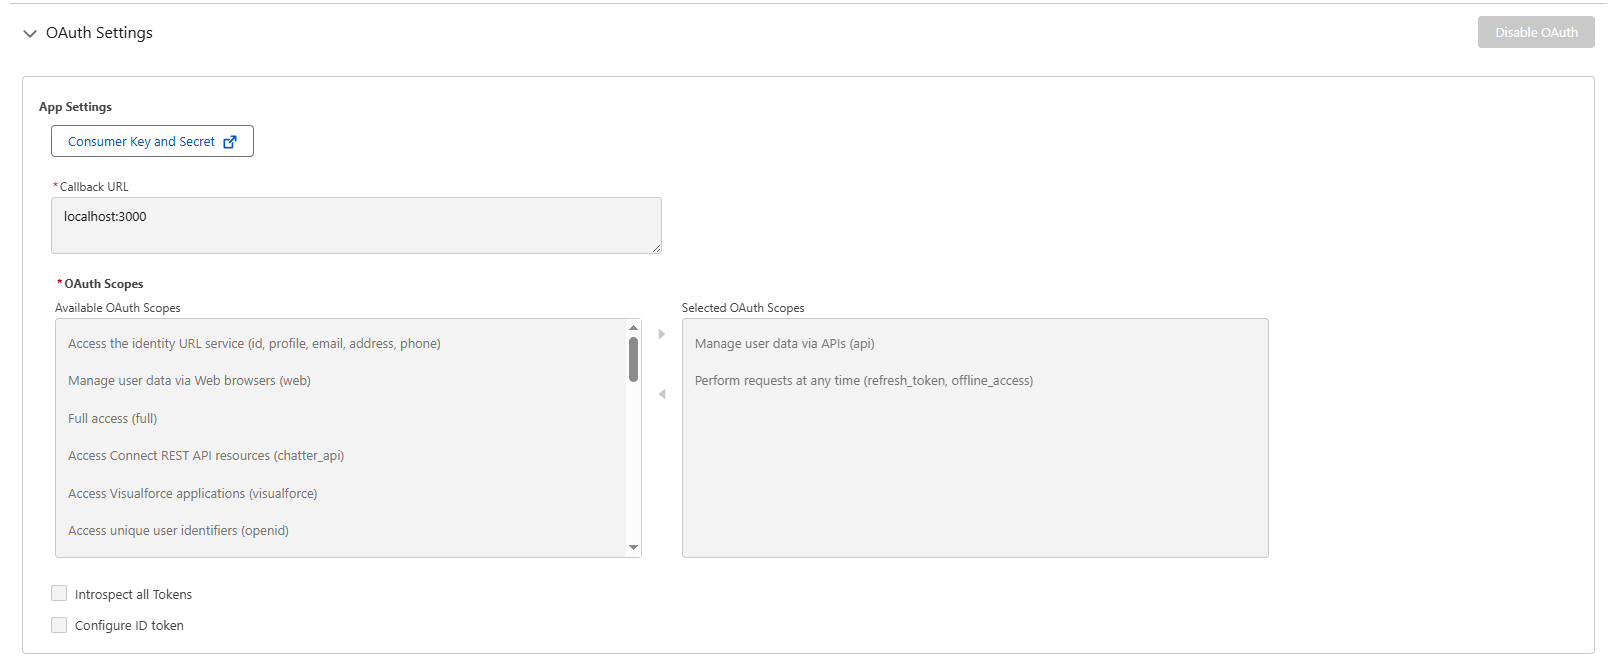
- Flow Enablement: This represents the strategy or method used to obtain the access token needed to communicate with Salesforce. One option or another will be used depending on the needs of the external server.

Client Credentials Flow
The Client Credentials Flow strategy uses a Client Id, also known as the Consumer Key, and a Client Secret, also known as the Consumer Secret, as if they were the username and password of the External Client App.
Those credentials are available through the Consumer Key and Secret button in the OAuth configuration.
You need to be very careful about how these credentials are stored and shared, because anyone with access to them will have access to the External Client App.
In Salesforce, every operation runs under a user context. Since Client Credentials Flow does not identify a specific user, you must manually define one that will act as the execution context for all requests.
That user is configured in the policy section of the External Client App. It is important to choose it carefully: every transaction will run with that user's permissions. If the user does not have access to a given object or action, the request will fail with a permissions error.

Once Client Credentials Flow is enabled and a context user is configured, those credentials can be used to obtain the Salesforce access token with the following request.
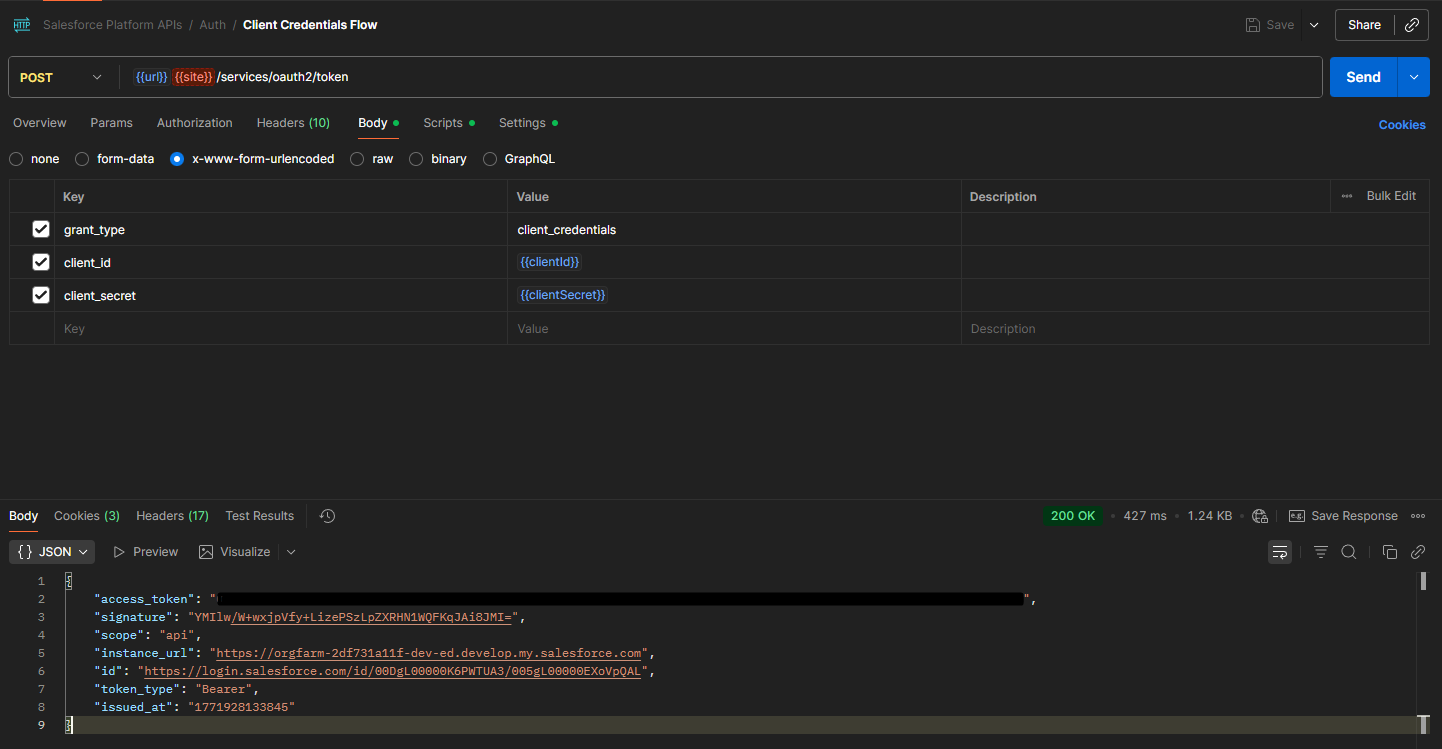
Variables used in the request:
- Url: This is the login URL of the Salesforce org you are working with. In a production org you can use login.salesforce.com, in a sandbox you can use test.salesforce.com, and in a Developer Edition org you need to use its specific domain.
- ClientId: Consumer key obtained from the External Client App configuration.
- ClientSecret: Consumer secret obtained from the External Client App configuration.
JWT Bearer Flow
The JWT Bearer Flow strategy uses a token in JWT format, JSON Web Token, signed with a private key and exchanged for an access token.
The process is:
- The external server creates a private key and an X.509 certificate.
- The certificate and public key are shared with the External Client App.
- The external server signs the JWT with the private key and sends it to Salesforce.
- Anyone holding the public key from that certificate can verify where the token came from; Salesforce verifies it against the configured certificate and responds with the access token.
The certificate is configured in the External Client App settings.

Once the server has built and signed the JWT with the private key, it can send it to Salesforce and exchange it for an access token with the following request.
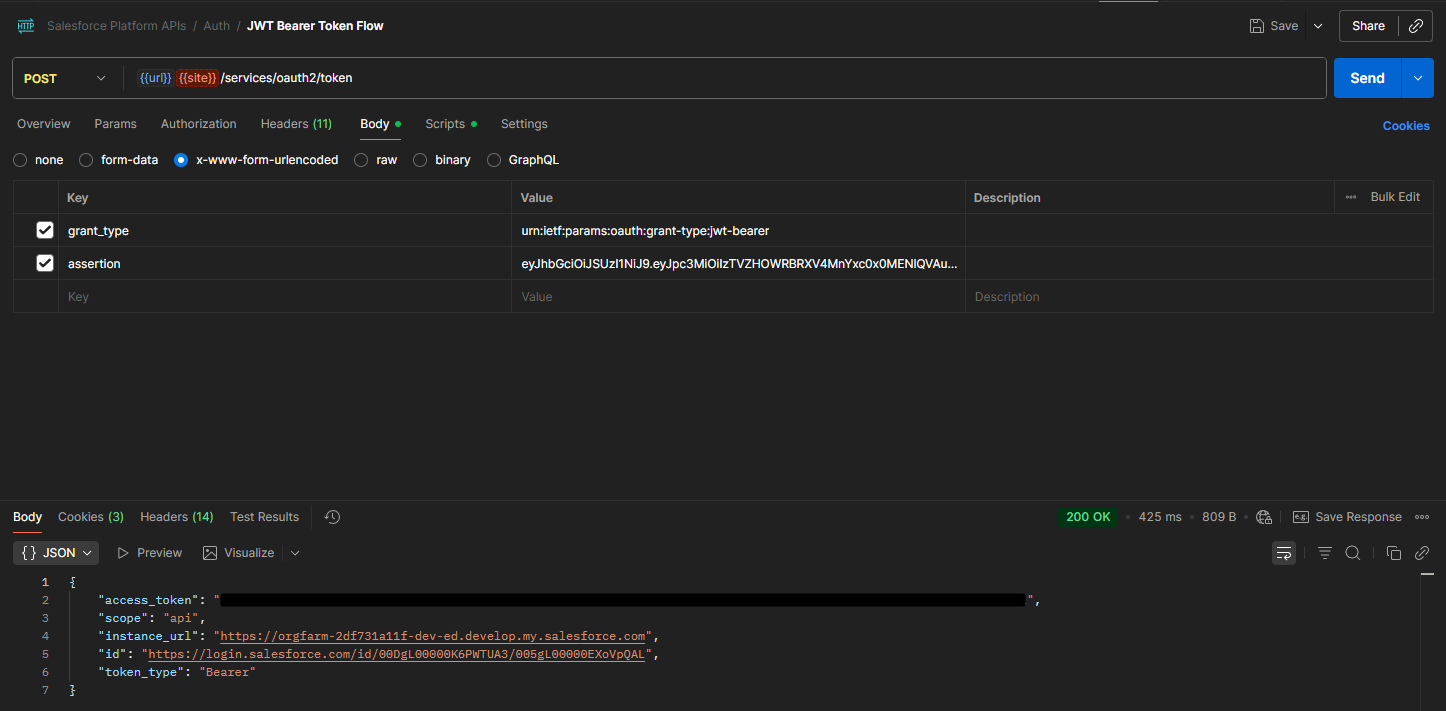
Variables used in the request:
- assertion: JWT signed by the external application using the private key that was configured in the External Client App.
A JSON Web Token (JWT) is an open standard used to securely transmit information between parties as a compact JSON object signed digitally.
It has three parts separated by dots:
- Header: Indicates the signing algorithm used.
- Payload: Contains the data stored in the token.
- Signature: The signature ensures the token has not been modified and lets you verify its origin.
The payload of a JWT typically includes the following fields:
- iss: Who issues the token. Here you must use the Consumer Key of the External Client App.
- sub: Salesforce user used for login. Everything executed with this token will run in that user's context.
- aud: Who the token is meant for. Here you must use the Salesforce login URL.
- exp: Token expiration time.
- iat: Marks the exact time when the token was generated.
{
  "iss": "3MVG9...<consumer_key>",
  "sub": "user@myorg.com",
  "aud": "https://login.salesforce.com",
  "exp": 1741200000,
  "iat": 1741196400
}
How the token is created and signed depends on the language and stack you are using. Below is a reference implementation that follows the algorithm recommended by Salesforce: RS256, which uses asymmetric key cryptography.
/**
 * Generates a JWT signed with the private key configured in environment vars.
 *
 * A JWT (JSON Web Token) is a compact object that contains information about
 * who is making the request. By signing it with our private key, Salesforce
 * can verify that it really came from us by using the public key it has on
 * record, and in exchange it returns an access token.
 */
async function generateJWT(): Promise<string> {
  // Read the private key from environment variables.
  // This key is secret and must never be exposed to the client or committed.
  const rawKey = process.env.JWT_PRIVATE_KEY;
  if (!rawKey) throw new Error("JWT_PRIVATE_KEY not configured");

  // Environment variables usually store line breaks as the literal "\\n"
  // instead of the real newline character. This converts them back so the PEM
  // block is valid.
  const privateKeyPem = rawKey.replace(/\\n/g, "\n");

  // A PEM key has a very strict format: it starts with
  // "-----BEGIN PRIVATE KEY-----" and ends with
  // "-----END PRIVATE KEY-----". We extract that block to ensure the key is valid.
  const privateKeyMatch = privateKeyPem.match(
    /-----BEGIN PRIVATE KEY-----[\s\S]+?-----END PRIVATE KEY-----/
  );
  if (!privateKeyMatch) throw new Error("Invalid PEM private key");

  // Convert the key from PEM format (readable text) to the binary format
  // expected by the Web Crypto API / Node runtime.
  // Steps:
  //   1. Remove the PEM BEGIN/END headers
  //   2. Remove all spaces and line breaks
  //   3. Decode the resulting Base64 string into raw bytes
  //   4. Import those bytes as a PKCS8 private key using RSA-SHA256,
  //      ready for signing only (not exportable)
  const privateKey = await crypto.subtle.importKey(
    "pkcs8",
    Buffer.from(
      privateKeyMatch[0]
        .replace(/-----BEGIN PRIVATE KEY-----/, "")
        .replace(/-----END PRIVATE KEY-----/, "")
        .replace(/\s/g, ""),
      "base64"
    ),
    { name: "RSASSA-PKCS1-v1_5", hash: "SHA-256" },
    false,
    ["sign"]
  );

  // Read Salesforce org data from environment variables.
  // These three values become the JWT payload:
  //   - consumerKey: identifies our application (External Client App) in Salesforce
  //   - username: the Salesforce user whose context will execute the requests
  //   - audience: the Salesforce login URL the token is intended for
  const consumerKey = process.env.SALESFORCE_CONSUMER_KEY;
  const username = process.env.SALESFORCE_USERNAME;
  const audience =
    process.env.SALESFORCE_LOGIN_URL || "https://login.salesforce.com";

  if (!consumerKey) {
    throw new Error("SALESFORCE_CONSUMER_KEY not configured");
  }
  if (!username) {
    throw new Error("SALESFORCE_USERNAME not configured");
  }

  // Build and sign the JWT with the `jose` library.
  // Each method adds one standard field to the token:
  //   - setProtectedHeader: signing algorithm (RS256 = RSA + SHA-256)
  //   - setIssuer:          "iss" - who issues the token (our app)
  //   - setSubject:         "sub" - on behalf of which user the request runs
  //   - setAudience:        "aud" - who the token is for (Salesforce)
  //   - setExpirationTime:  "exp" - token expires in 3 minutes (Salesforce limit)
  //   - setIssuedAt:        "iat" - exact generation timestamp
  //   - sign:               signs the content with our private key
  return new SignJWT({})
    .setProtectedHeader({ alg: "RS256" })
    .setIssuer(consumerKey)
    .setSubject(username)
    .setAudience(audience)
    .setExpirationTime("3m")
    .setIssuedAt()
    .sign(privateKey);
}
Client Credentials Flow vs JWT Bearer Flow
Both login strategies in an External Client App are valid ways to implement server-to-server integrations. But they come with different characteristics, advantages, and tradeoffs.
Client Credentials Flow is much easier to configure and operate, since you only need to generate a Consumer Key and Consumer Secret and use both in the token request. However, it is not ideal to expose the Consumer Secret continuously in requests.
JWT Bearer Flow is harder to configure. As we have seen, it requires generating a private key and a certificate with a public key to share with Salesforce, but in this model the private key never leaves the external server; the only thing exposed is the JWT, and that token is short-lived.
It is also important to keep in mind that Client Credentials Flow requires sharing sensitive information with the external server, which means you need a secure channel for that exchange. In JWT Bearer Flow, the server shares a certificate with a public key with Salesforce, which still requires secure handling, but if that certificate is accidentally exposed it is far less dangerous than exposing a Consumer Secret.
Given all those differences, Salesforce generally recommends JWT Bearer Flow for secure server-to-server integrations whenever the external server is capable of generating and signing the JWT correctly.
If you want to see JWT Bearer Flow in action, I have a working demo that authenticates against Salesforce in real time: it generates the JWT signed with the private key, exchanges it for an access token, and runs a SOQL query. You can access the demo here.
Conclusion
Inbound integrations in Salesforce can look complex at first, but once the authentication mechanisms are clear, the path becomes much easier to navigate. The decision between Client Credentials Flow and JWT Bearer Flow depends on the security level you need and on the capabilities of the external system:
- Use Client Credentials Flow when you need a quick setup and the environment is secure enough to protect the Consumer Secret.
- Use JWT Bearer Flow when security is the priority, especially in production environments or when handling sensitive data.
In both cases, apply the principle of least privilege: configure only the OAuth Scopes you really need and grant the execution user only the minimum permissions required.
| Feature | Client Credentials | JWT Bearer |
|---|---|---|
| Requires a secret? | Yes (Consumer Secret) | No |
| Requires a certificate? | No | Yes (RSA 2048) |
| Immediate revocation | Yes | No (until the JWT expires) |
| Initial setup | Low | Medium-High |
| Recommended for | Fast internal integrations | Environments without shared secrets |
What next?
Once you have the access token, you already hold the key. The next step is to use it: call Salesforce REST APIs to read records, create data, or execute actions.
In the next article we will look at exactly that: how to build requests against the Salesforce REST API, which endpoints are available, how to handle token renewal when it expires, and a working real-world example.
Do you have any questions about the article? Write to me!